Monday, March 30, 2020

How to Capture a Student's Game Board and Add Hebrew in Zoom

In response to my previous post, Games for Teaching Hebrew (or any language, really), lsachs wrote: Great ideas. Could you give some details on how to capture the board and add the Hebrew. Thanks. 

When my reply ended up being rather lengthy, I figured it would do better as a separate blog post.

I teach via Zoom, and Zoom has a feature that allows you to share your screen. It is the green
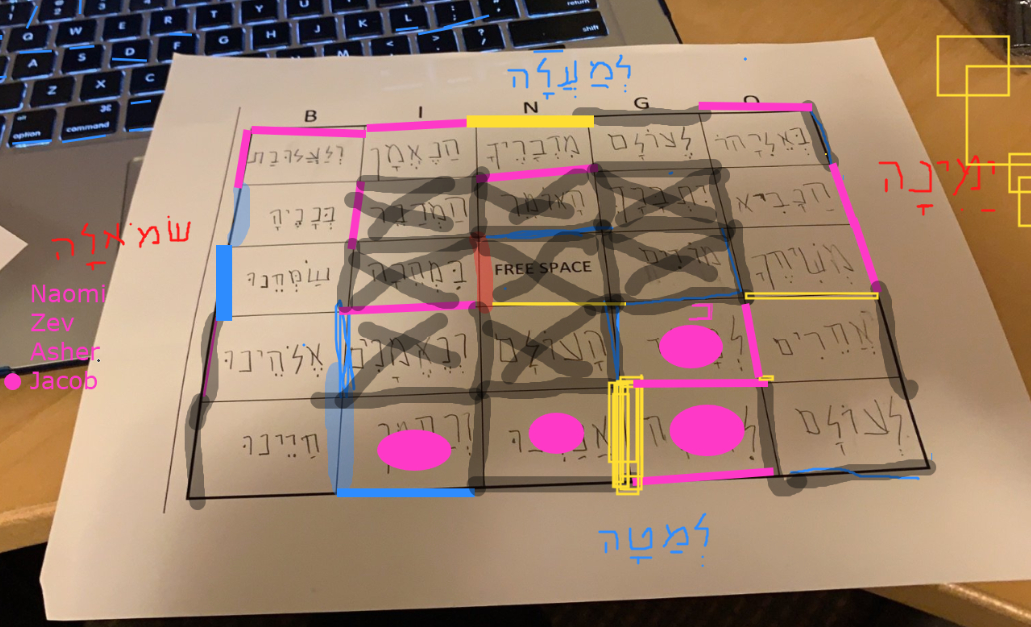
"Share" button in the middle of the tool bar. I open the image, share my screen, and once I am sharing, I am able to use the "Annotate" feature to write Hebrew over it. In this case, I wrote the Hebrew words for right, left, up, up and down so that my students could tell the class in Hebrew
which word they were reading in our Squares game. As the host, you find "Annotate" in the tool bar, which will drop down when you hover over the top of your screen (or wherever you see the green and red bar, notifying you that you are sharing your screen.) You must already be sharing your screen to see the "Annotate" option.


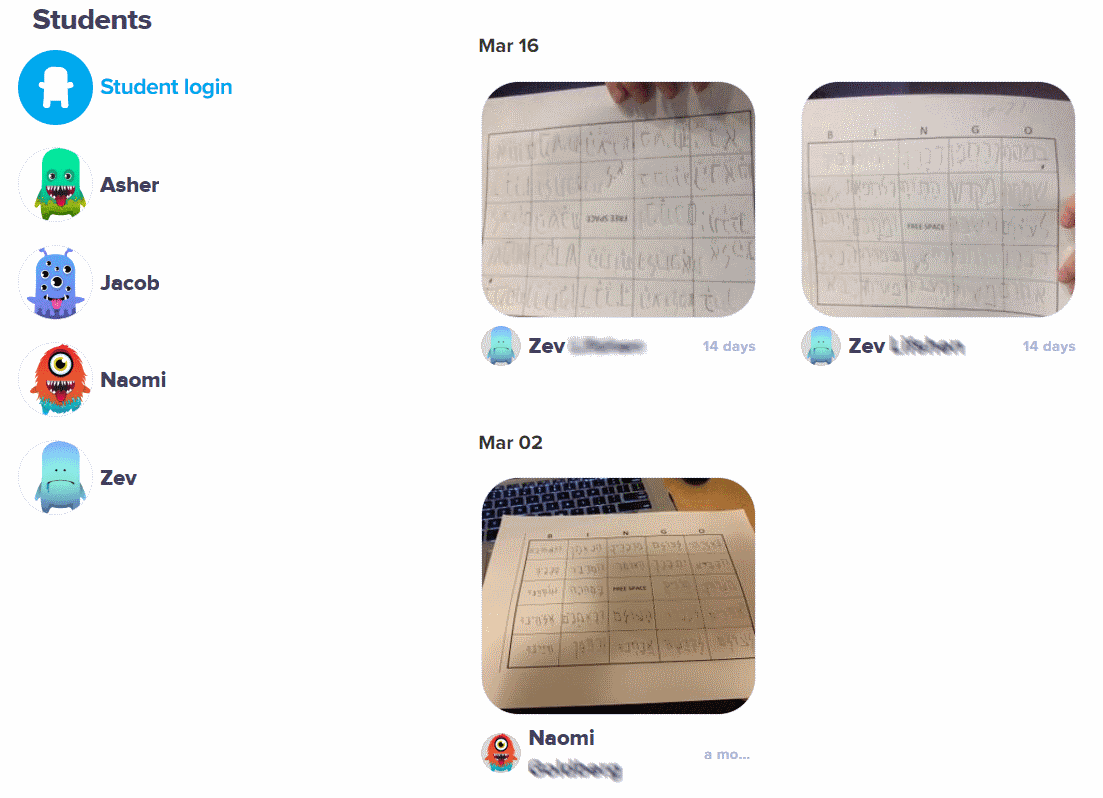
Class Dojo's Portfolio, where students submit their work.
If you are wondering how I got the picture of the board in the first place, you have a few options. I use the free app Class Dojo to receive images from my students and their families. (You can watch a 4-minute video introduction to Class Dojo here.) There is a little bit of set-up involved, but really not much and it is well worth it to have a convenient way to share, collaborate and communicate with students. Anyway, using the app, they are able to take a photo of their work and send it to me. I receive their work in real-time and can then share it on my screen.

Another option is to ask parents (or able students) to take a photo of their work with a smartphone and email the picture to you. The negative is that this can be hard to coordinate during class and often has to be done as homework.

If you don't want your students or their parents to deal with yet another technology, you can take a screenshot (a.k.a. print to screen) of your students holding their work up to the video camera. They DEFINITELY should write with dark-colored markers to make sure the letters are visible, and they need to be very steady. You will want to set your Zoom view to "speaker view" so that you see one student at a time in full screen. (Whoever is talking will show up, so you may need to mute the other students so that you aren't dealing with different students flashing on the screen while trying to take a screenshot.)

If you are unsure how to print to screen and you have a PC, watch this 45 second video: How to take a screenshot.
If you have a MAC, hold down these three keys: Shift + Command + 3 
The image should save to your desktop.

Tuesday, March 24, 2020

Games for Teaching Hebrew (or any language, really)

Recently I gave crash course workshops to Hebrew and religious school teachers in order to help prepare them for teaching online. The discussions inspired me to come up with new games and activities for my students. I researched popular board games, specifically looking for games that are sufficiently engaging, but not so strategically-focused that the students would spend the whole class period on strategy instead of reading Hebrew.
Here are games I already play with my students:
  • Snakes and Ladders: I bought a simple Snakes and Ladders stock graphic (though you can find free versions online) and have my students read Hebrew words before they role the die and take their turns. Judaics teachers could ask students to answer quick Judaic questions in order to take their turns.
  • Guess Who: Students use simple modern Hebrew phrases and clothing / body vocabulary to identify the chosen character.
  • Tic-Tac-Toe: Students have to read the word written in the Tic-Tac-Toe cell before putting their mark. It's even better if you get the students to create the boards. (Tip: If they are creating the boards by hand, ask them to use markers to write so that the writing is bold enough to be seen when they submit a photo.)
  • Bingo: Someone calls out a word and the students have to check their boards for that word; it's silent reading, but reading nonetheless. There are added benefits if they create their own boards, and it's even better if you let them take turns choosing the words so that they practice reading out loud as well. 
  • A Game of Squares
  • Squares: We play this a lot, especially when students are supposed to make Tic-Tac-Toe or Bingo boards for homework and some students forget. This happens almost every time, so we usually end up postponing our game and playing Squares for a week or two first. The goal is to claim the most squares by putting your mark into them. The way to accomplish this is by being the person to "close" the square by adding the fourth side. In each turn, the student identifies where she wants to draw a single line. Then she reads the word on either side of the line. If she reads correctly, she can put down her line. Eventually, students run out of options for drawing lines, and they are forced to draw the third side of a square, opening up the opportunity for others to close the square. If you close a square, you get an additional turn, and there is no limit to the number of additional turns. A student can get a streak that could earn him ten or more closed squares before the next student gets her turn.
  • Clue: You can find templates for digital Clue boards for free online. I have a lot of lessons learned associated with this game, so I think I'll write a separate blog just about this one... mainly because the lessons learned would help guide any other ambitious teacher who may want to turn their favorite board games into teaching tools.

The first game I created as a result of my research was Connect 4. I actually created this game on Sunday and tried it out yesterday for the first time with my 5th and 6th grade classes. Huge success!! The goal is to get four tokens in a row. Imagine there is gravity in this virtual game, so before you could place a token in the top row, all the lower spaces in that column need to be filled with tokens. I just found a template for the board online and added Hebrew words to each opening. I created two separate boards for my 5th and 6th graders, using the words from the prayers we are studying. (I created another board for my mixed-level Hebrew classes at other schools. This versatile board includes one letter and one simple word in each opening so that students can choose to read one or the other depending on their reading levels.) I divided the students into two teams. Students from each team took turns reading, and the others kids on the team confirmed (in Hebrew) whether they agreed with the pronunciation. If they didn't, they were allowed to advise the reader to adjust her pronunciation, but ultimately, it was the reader's decision that counts. If her final decision was incorrect, she did not get to place her token. 30 minutes was not long enough for my 5th graders to finish their game, so I started earlier with my 6th graders, and they were able to finish it up in about 40-45 minutes.

Tune in for more game ideas and lessons learned in the coming weeks.